Despite growing up in a country where rice is a staple, how to cook rice was a skill that I learned late in life. I could cook pretty well by the time I was in my teens, but someone else always cooked the rice in our house.
By the time I got married, the rice cooker has become a regular item in many households. It took the guesswork out of cooking rice but the convenience made me even less efficient in cooking rice without an electric cooker.
I remember one time when we were still living with Speedy’s parents… The rice cooker broke down, I cooked rice in a pot on the stovetop and my mother-in-law saw me lifting the pot’s lid repeatedly to stir the rice. She was shocked. And I was even more shocked at why she was shocked.
It turns out you’re not supposed to stir the rice that way. Well, unless you’re making risotto. But more about the stirring later. The first step toward cooking rice perfectly is to understand the characteristics of rice.
Understanding rice varieties
When you buy rice, the experience can be daunting. The varieties seem endless, rice comes in so many colors and there are additional classifications including geographic origin.
Understand that geographic origin is just a marketing thing. Even Japanese rice (a.k.a. sushi rice) is not always grown in Japan. What is more important is to know the starchiness, stickiness, fluffiness, aroma and mouthfeel of the variety you’re buying.
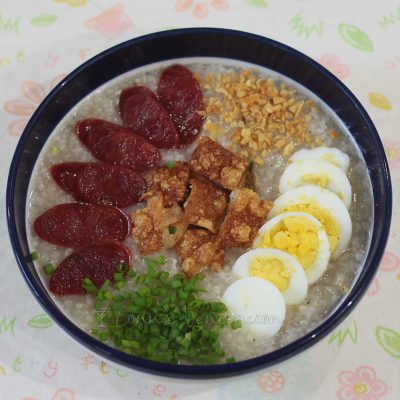
Yes, it can take a while identifying which is the ideal (subjective, of course, as “ideal” depends on personal preferences) all-purpose rice, which is best for cooking fried rice, which is good for making congee, and so on and so forth.
If you’re new at rice buying, stay away from specialty rice varieties. You don’t need expensive sushi rice or risotto rice for everyday cooking. Read rice labels to get acquainted with the characteristics of each variety then choose something generic.
Rice is classified according to the length of the grain
The level of starchiness affects the stickiness of the rice. Generally, the starchiness of rice is inversely proportional with the length of the grain. In other words, short-grain rice is the stickiest. The longer the rice grain the less starchy the rice and, therefore, less sticky. Glutinous (sticky) rice is a class all its own.
If your family prefers rice that clamp together when scooped, go for short- and medium-grain rice. If the preference leans toward rice with grains that separate when fluffed with a fork, go for long-grain rice.
Measure rice to determine the amount of water required
How much water you need to cook the rice depends on the amount of rice you’re cooking. Here is a list of things to remember.
- There is no universal ratio between rice and water.
- Newly harvested rice has more moisture in the grains and only a minimal amount of water is needed. One part rice with one part water is a good formula to begin with.
- The more aged the rice, the more water is required to cook the grains. One part rice with one-and-a-half parts of water is a good starting point.
- On a very general sense, short-grain rice requires less water than long-grain rice.
With all that in mind, there are two ways to measure your rice — by weight or by volume. There are endless debates about which is better but I belong to the volume school of thought. I measure rice and water by cup rather than by weight.
Does rice need to be rinsed?
Rinse, yes. Always. I don’t care if rinsing strips off nutrients from fortified rice. Two reasons. First, to remove excess starch. That excess starch can spell the difference between perfectly cooked rice and rice that looks like pudding.
Second, arsenic. Arsenic naturally occurs in rice but much of it can be removed by rinsing prior to cooking.
To rinse rice, place the rice in a bowl, place the bowl under the tap and fill with enough water to cover the rice by at least two inches. Swirl the rice with your hands. The water will turn cloudy. Pour out the water. Repeat the process until the water runs clear or almost clear.
Does rice need to be soaked before cooking?
Soaking rice is optional except in two instances:
- In the case of brown, black and red rice, and other whole grain rice which typically require longer cooking. Soaking the rice allows the bran that covers the grain to soften to shorten cooking time.
- In certain recipes that require the rice to be steamed rather than boiled.
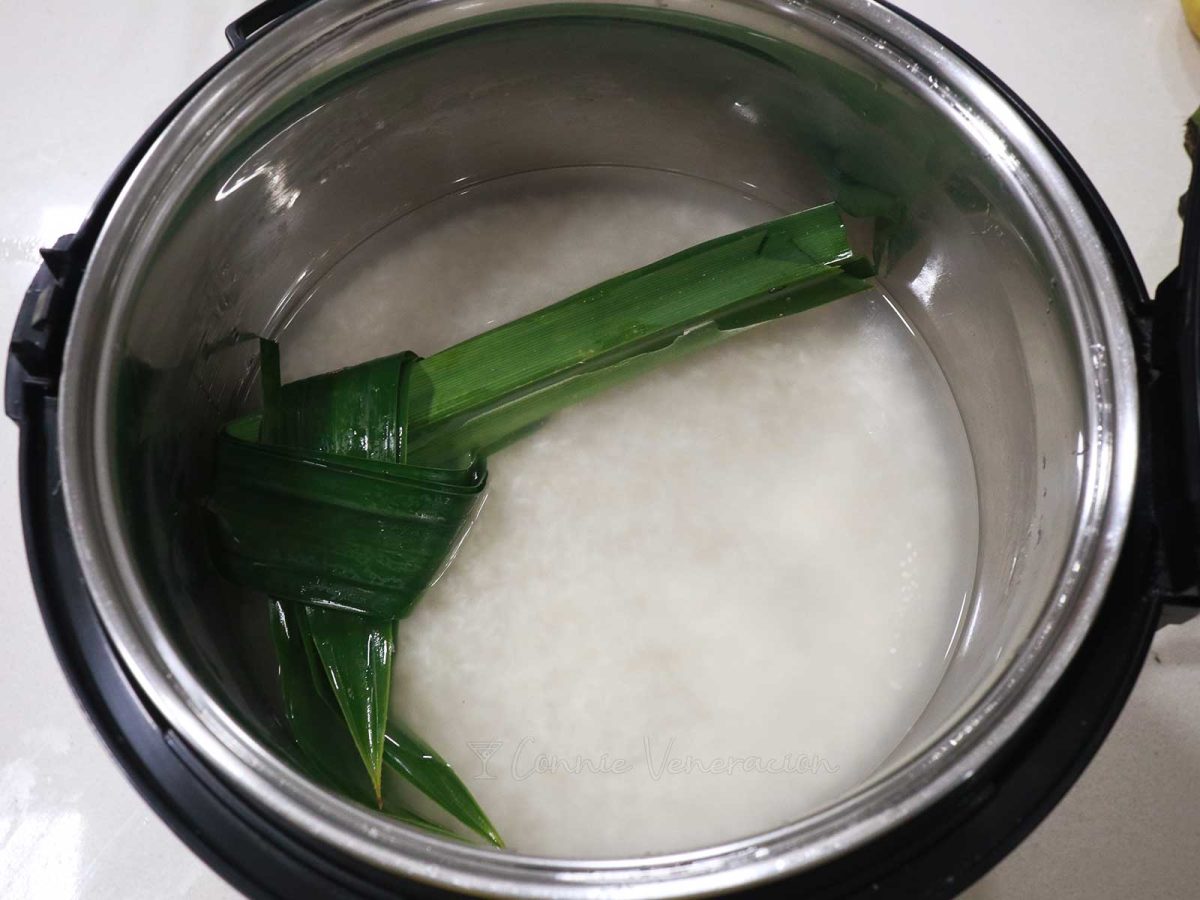
Cooking rice in an electric rice cooker
To cook rice in the rice cooker, after rinsing (and soaking if needed), drain the rice thoroughly and pour into the cooker. Add the required amount of water (or broth and, optionally, spices), turn the rice cooker on and let it do its job. Let the rice sit for about five minutes then fluff up with a fork.
Cooking rice on the stovetop
An electric rice cooker is convenient but not a necessity. You can easily cook rice on the stovetop following these guides.
- Use a pot with a thick bottom to prevent scorching.
- Rinse the rice as described above, pour into the pot and add the required amount of water.
- With the pot uncovered, bring the rice to the boil. Stir once to suspend the grains in the liquid. This is the part you dispense with when using a rice cooker. The insulated rice cooker distributes heat evenly whereas, on the stovetop, heat comes from underneath. Since the tendency of the rice is to clamp together in the heat, before they turn soft, it is best to stir and separate them so that they are more evenly distributed in the water.
- After that singular stir, set the heat to low and cover the pot. Simmer the rice for 15 to 20 minutes or until the rice is done and all the water has been absorbed.
- Let the rice sit for about five minutes then fluff up with a fork.
Cooking rice in the microwave
Now, this is something I learned the hard way. I inherited a microwave rice cooker but using it made the water pour out of the cooker and left a starchy mess on the microwave’s turntable. I don’t use it anymore for cooking rice but I did learn to cook rice in the microwave eventually without making a mess.
The trick is to use hot water. Or broth, if you prefer more flavor. Pour the required amount of water (make sure it’s hot!) into your microwave-safe pan, add the rice and stir. Cover the pan and cook on HIGH for 10 minutes. Leave for five minutes. Cook on HIGH for another five minutes.
Note that the 10-and-5-minute cooking times are for a cup of rice. The cooking time will be longer if you’re cooking more rice.
Cooking rice in the steamer
There is an interesting Asian method of cooking rice without allowing the grains to touch the water directly during cooking. A steamer basket is covered with cheesecloth, rice is spread on the cheesecloth, the steamer is covered and the rice cooks in the steam.
There is one essential extra step when cooking rice by steaming — the rice must first be soaked. Otherwise, the steam alone won’t be enough to cook the grains.
To soak the rice prior to steaming, rinse first then drain and place in a bowl. Pour in twice as much water. Cover the bowl loosely and leave the rice to soak (in the fridge if it’s hot in your kitchen; otherwise, the rice might ferment) until plump. If you use a glass bowl, you will see the rice double in height. Drain the rice and it’s ready for the steamer.